 Pop Studio
 App Tutorial: Make Your First Photo Collage
New to Pop Studio? This beginner guide walks you from the home screen to a finished photo collage saved in your gallery, one tap at a time.
You have a camera roll full of good moments and no quick way to turn them into something worth posting. Desktop design tools are overkill, and many phone apps bury the useful parts under sign-up screens and permission prompts. This Pop Studio app tutorial is the short path: from opening the app for the first time to saving a finished photo collage in your gallery, in about the time it takes to make a coffee.
Pop Studio is a photo collage app for Android that also does posters, stickers, text and filters. Everything runs on your phone. You do not create an account, you do not grant storage access, and your photos are never uploaded. That makes it a good first app to learn, because there is nothing to set up before you can start creating.
In this guide you will learn what each part of the home screen does, how to pick several photos at once with the Android photo picker, what the seven collage tabs are for, and how to export your result as JPEG or PNG. Along the way we point you to deeper guides for each feature, so you can come back to them once the basics feel natural.
What Pop Studio is (and what it is not)
Pop Studio is built around one idea: drop in your photos and play. The app has two main ways to create. Collage places up to 9 photos into a layout you choose and lets you style the result. Poster starts from a finished design, such as a birthday card or a travel poster, and asks you to fill in the photos. On top of either one you can add stickers, text and filters.
It is not a professional raw editor and it does not try to be. There are no layers panels with blend modes or curves. Instead, every control is a clear tab or a slider with a number next to it, so you always know what changed. If you want a finished, shareable image in a few minutes, that trade-off works in your favour.
What you need
- An Android phone running Android 7.0 or newer.
- The free app from Google Play. You can find the install link on our download page.
- A few photos you would like to combine. Two is enough to try a collage; up to 9 fit in one.
The app is free with ads. An optional Pro upgrade removes ads and unlocks premium content, but nothing in this guide requires it.
A tour of the home screen
When you open Pop Studio you land on the home screen. It is designed so the two main actions are the biggest things you see, with shortcuts and ready-made designs below them.
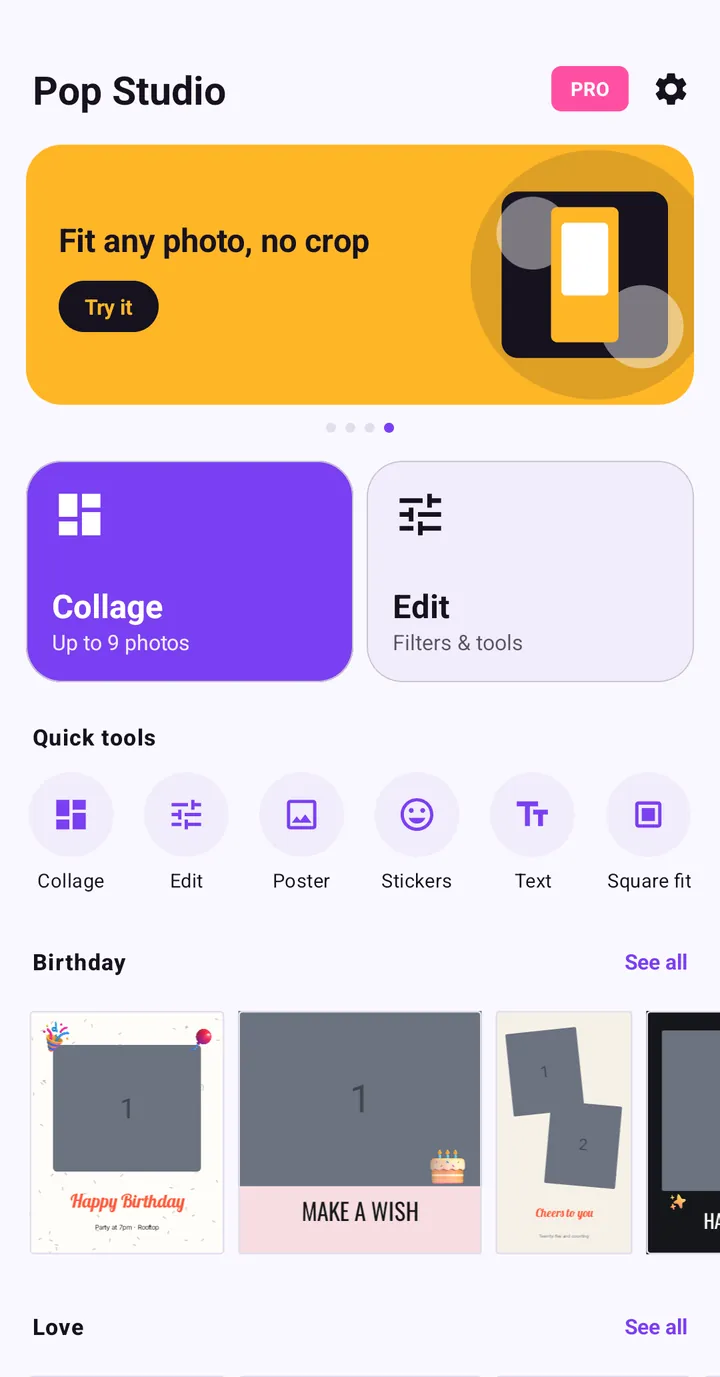
The banner carousel
At the top is a rotating banner that highlights one feature at a time, for example "Fit any photo, no crop" with a Try it button, or a card about fresh sticker packs. Swipe it or simply ignore it; it is a shortcut, not a required step.
Collage and Edit
The two large cards are the heart of the app. Collage (labelled "Up to 9 photos") starts a new collage. Edit (labelled "Filters & tools") is for working on a single photo. For your first project, start with Collage.
Quick tools
The Quick tools row gives one-tap entry points: Collage, Edit, Poster, Stickers, Text and Square fit. Square fit is the "fit any photo, no crop" idea from the banner: it lets a photo sit inside a square frame without cutting off the edges, which is handy for feeds that prefer square images.
Template rows
Below the tools are rows of poster designs grouped by occasion, starting with Birthday and Love. Each row has a See all link that opens the full poster gallery. Templates are covered in detail in our poster templates guide.
PRO and Settings
In the top-right corner you will see a pink PRO button and a gear icon for Settings. You do not need either one to get started.
Make your first collage in five steps
Here is the whole flow, from an empty screen to a saved image. Each step below takes a few seconds once you know where things are.
Step 1: pick your photos
Tap Collage. Pop Studio opens the Android system photo picker as a sheet that slides up over the app. This is the same picker Android uses for many apps, and it is the reason Pop Studio never asks for storage permission: you only share the exact photos you tap, nothing else.
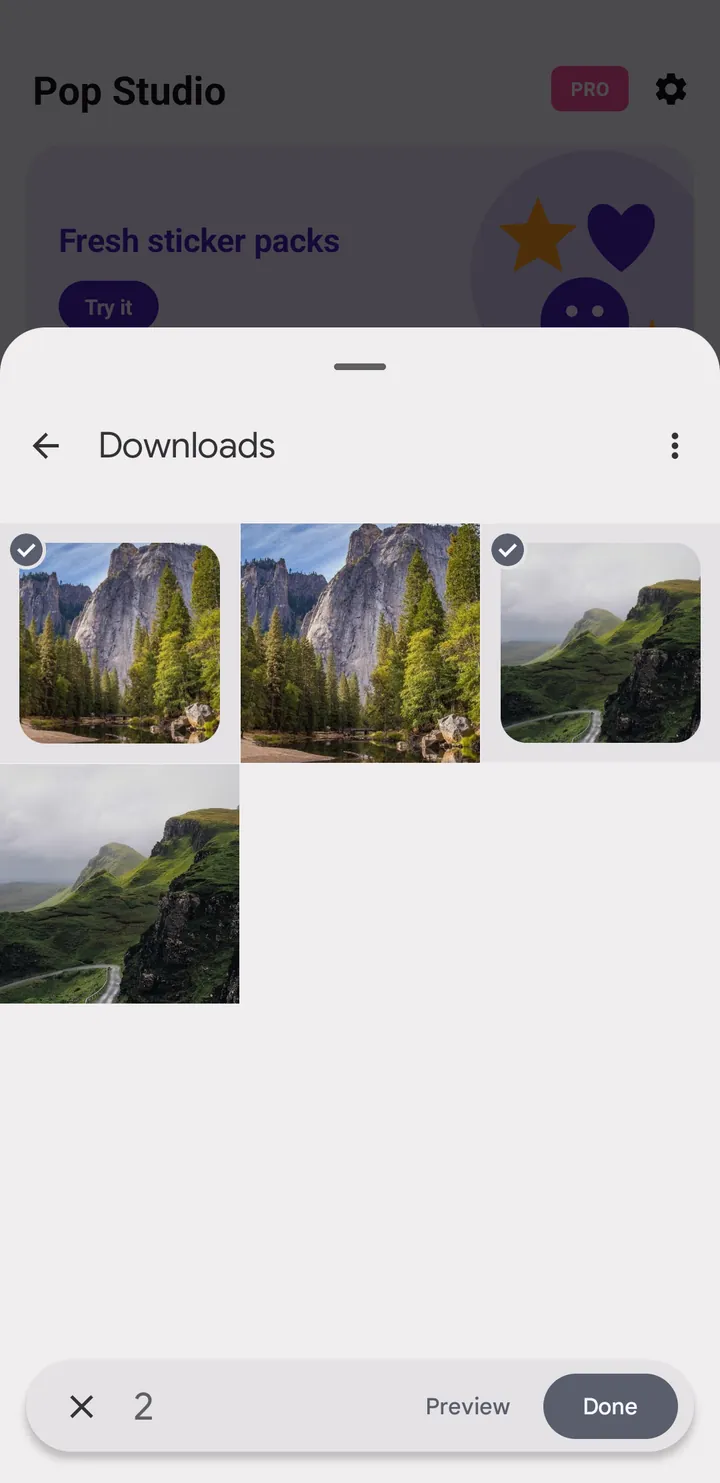
Selecting several photos
- Browse to the album you want. In the screenshot we are in Downloads; tap the back arrow to see other albums.
- Tap each photo you want. A check mark appears on the thumbnail and the counter at the bottom goes up.
- Tap Preview if you want to double-check your choice on a larger view.
- Tap Done. Your photos open in the collage editor.
Pick your strongest photo first. It is often placed in the largest cell of the layout, and it is easier to keep the hero image in mind if you choose it before the supporting shots.
Step 2: get to know the collage editor
The editor shows your collage in the middle, the number of photos at the top (for example "4 photos"), undo and redo arrows, and a purple Export button. Under the canvas is a short hint: "Tap a photo to edit · drag to move · pinch to zoom". That line sums up how you work with each photo cell.
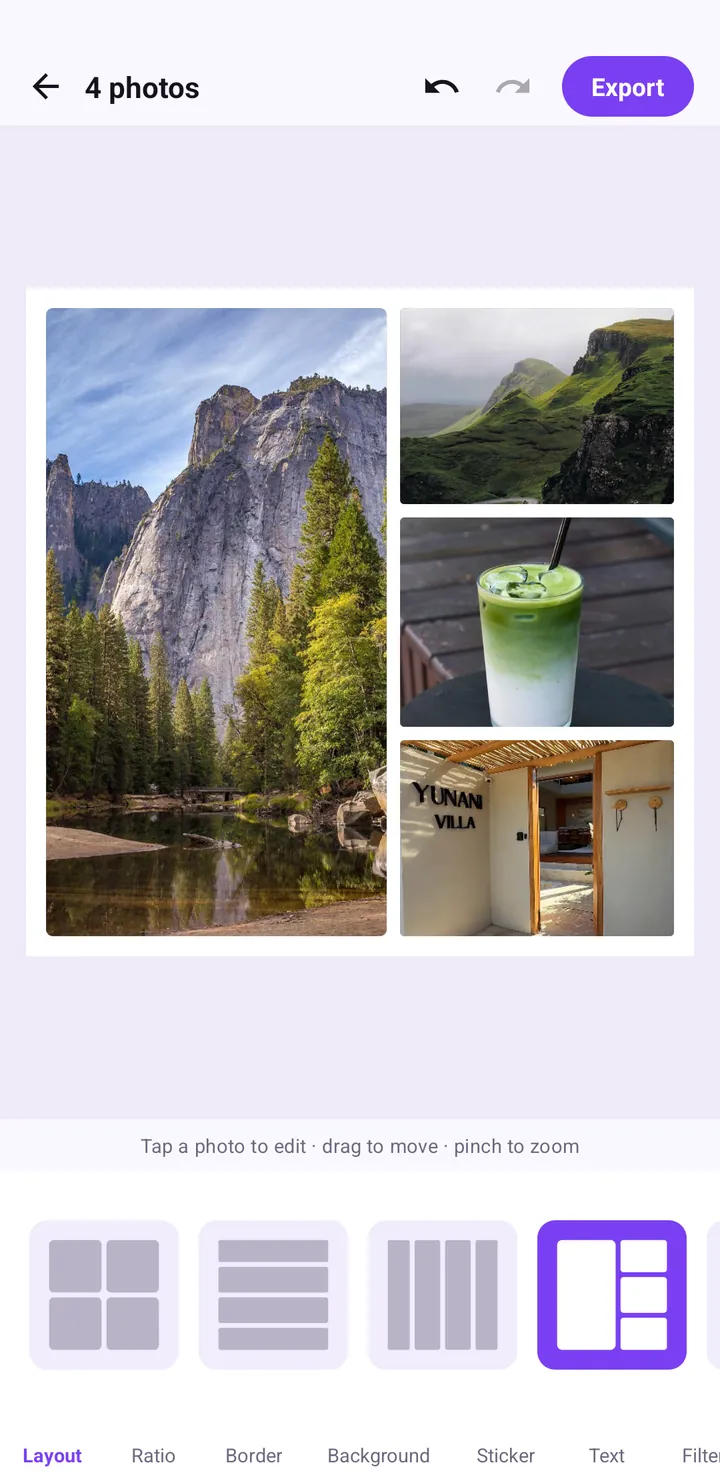
The seven tabs
Along the bottom are seven tabs. You do not need to visit all of them, but it helps to know what each one does:
| Tab | What it does |
|---|---|
| Layout | Chooses how the photos are arranged: grids, rows, columns and mixed shapes. |
| Ratio | Sets the canvas shape: 1:1, 4:5, 9:16, 16:9, 3:4, 4:3 or 5:4. |
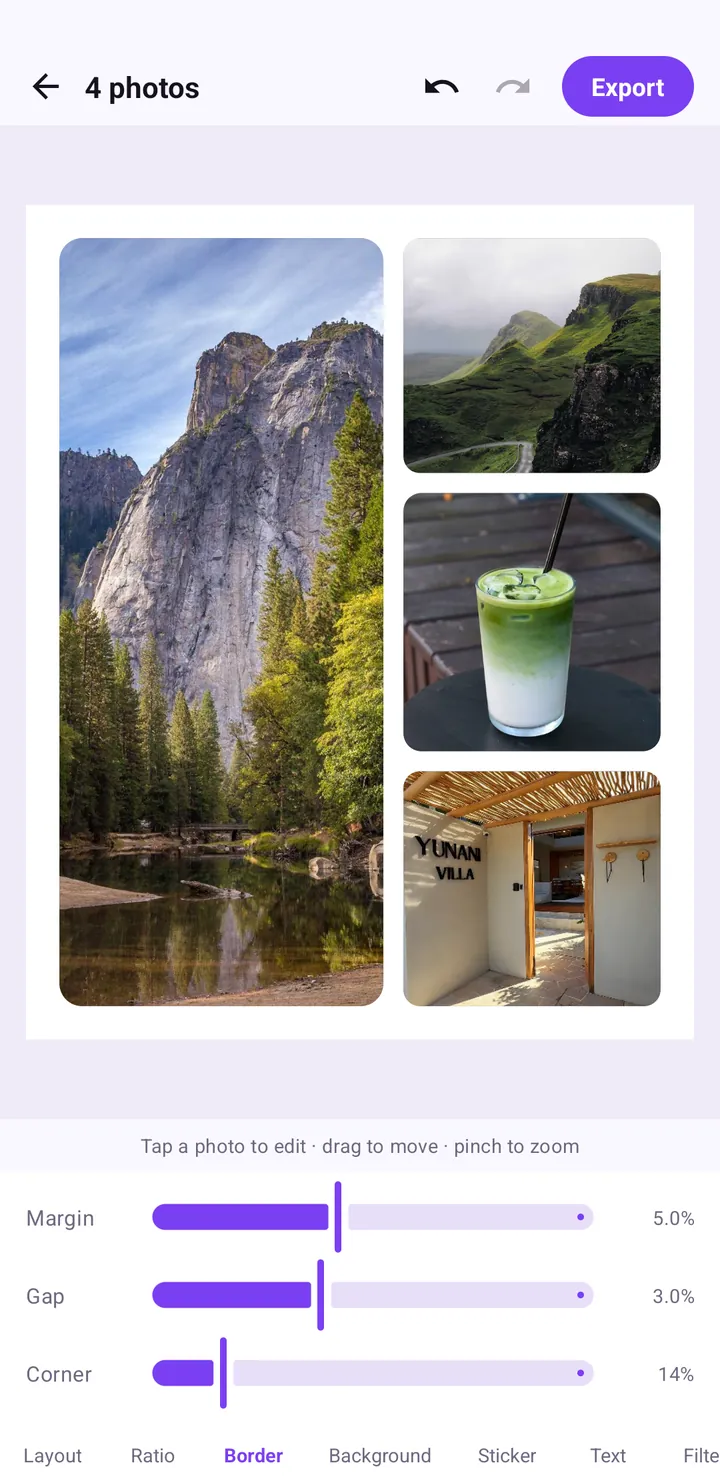
| Border | Three sliders: Margin (outer edge), Gap (space between photos) and Corner (rounding). |
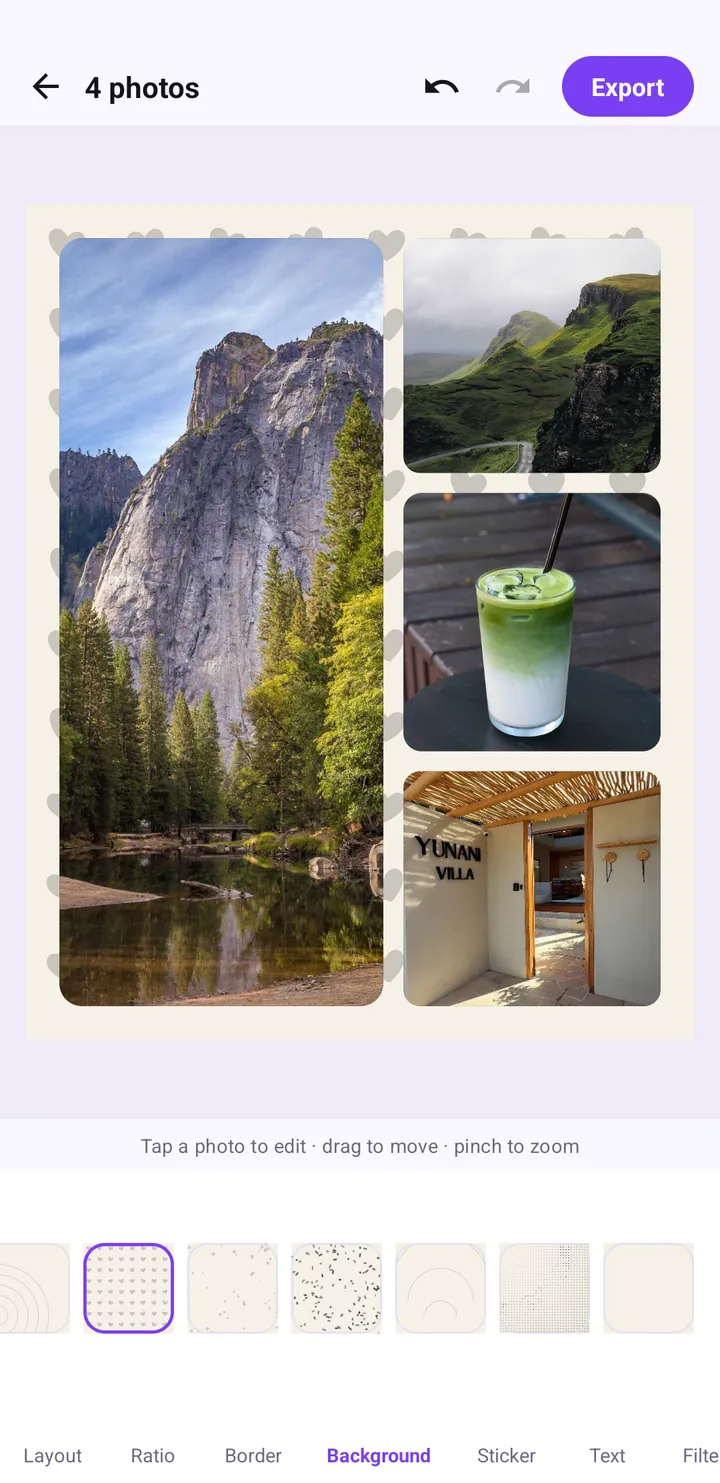
| Background | Colours and patterns that show behind and between the photos. |
| Sticker | Sticker packs such as Faces, Love, Party and Food, plus Recent and search. |
| Text | Adds captions with Font, Color, Style, Align and Opacity options. |
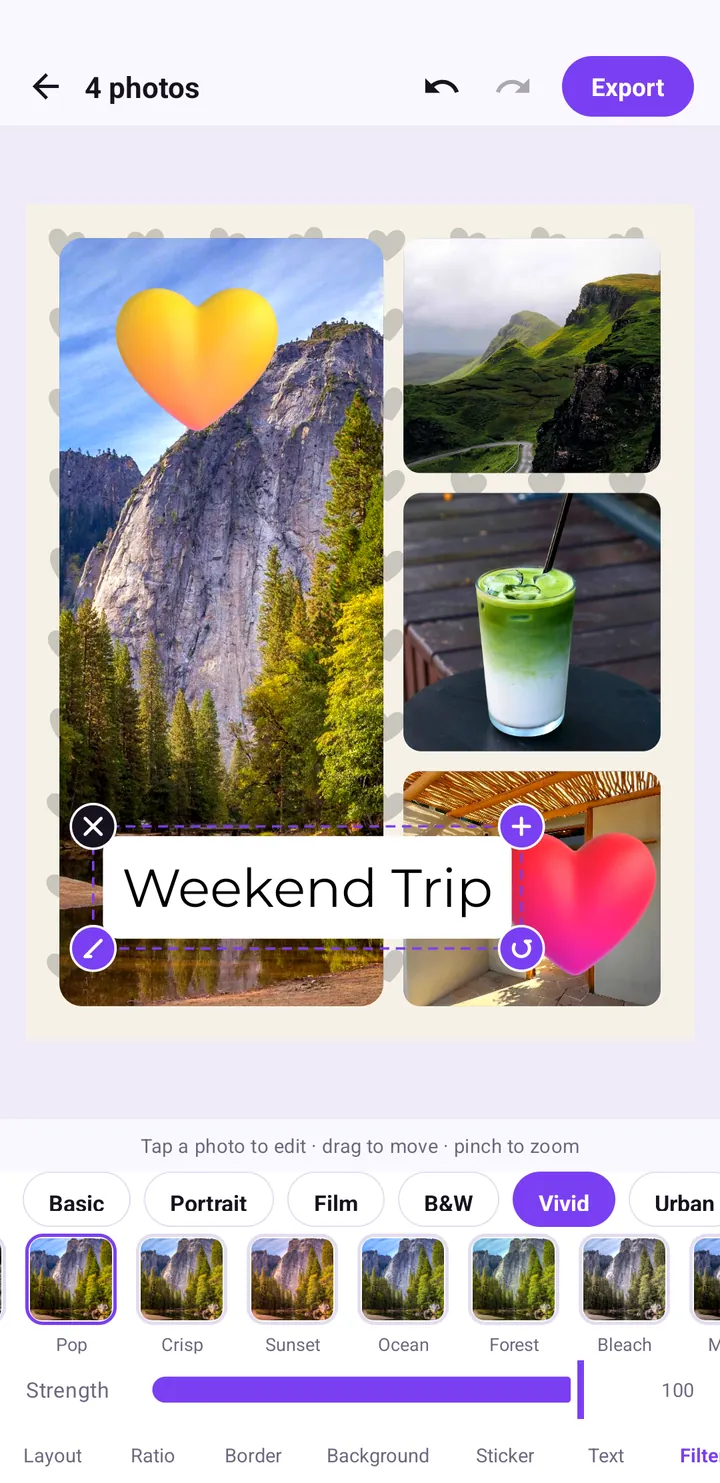
| Filter | Colour filters grouped into categories, with a Strength slider. |
For a full walk-through of layouts and how to arrange photos inside cells, read how to make a photo collage on Android.
Step 3: shape and style the collage
A quick, reliable order for beginners is Layout, then Ratio, then Border, then Background. Each step changes the overall structure, so doing them first means you will not have to reposition stickers or text later.
Choose a layout
On the Layout tab, scroll through the thumbnails and tap one. The highlighted thumbnail is the active layout. The available layouts match the number of photos you picked, so a 4-photo collage shows 4-cell options such as a 2 by 2 grid, four rows, four columns or one big photo with three smaller ones.
Pick a ratio for where you will post
On Ratio, choose 1:1 for a square post, 4:5 for a tall feed post, or 9:16 for Stories and full-screen formats. Our upcoming guide on ratio, border and background explains which to choose for each platform.
Add breathing room
On Border, the three sliders show their values as percentages. In our example, Margin is 5.0%, Gap is 3.0% and Corner is 14%. A little gap and soft corners make a collage look more polished than photos pressed edge to edge.
Set a background
On Background, tap a swatch. Plain colours keep the focus on the photos; patterns like the soft hearts in our example add personality, especially for birthday or couple collages.
Step 4: add stickers, text and a filter
This is where the collage starts to feel like yours. These three tabs work on top of the photos, so you can add, move and remove items freely.
Stickers
Open Sticker, choose a category and tap a sticker to place it on the canvas. A selected sticker shows a dashed box with corner handles; the X removes it. The full details are in our stickers guide.
Text
Open Text, type your caption and use the Font, Color, Style, Align and Opacity options to style it. Tap Done to place it. See how to add text to photos for typography tips.
Filter
Open Filter, pick a category such as Vivid, tap a filter like Pop, and adjust Strength if it feels too strong. A filter applied to the whole collage helps photos from different cameras look like they belong together.
Step 5: export and save
When you are happy, tap Export in the top-right corner. Pop Studio asks which format you want.
JPEG or PNG?
- JPEG · smaller file: the best choice for social media and messaging. Files are small and upload quickly.
- PNG · lossless: keeps every pixel exactly as rendered. Choose it if you plan to edit the image again in another app or print it.
The Saved screen
After export you see a Saved confirmation with the message that the image is in your Photos, in an album called "Pop Studio". From here you can share straight to Instagram, tap More for any other app, go back with Edit more, or start fresh with New.
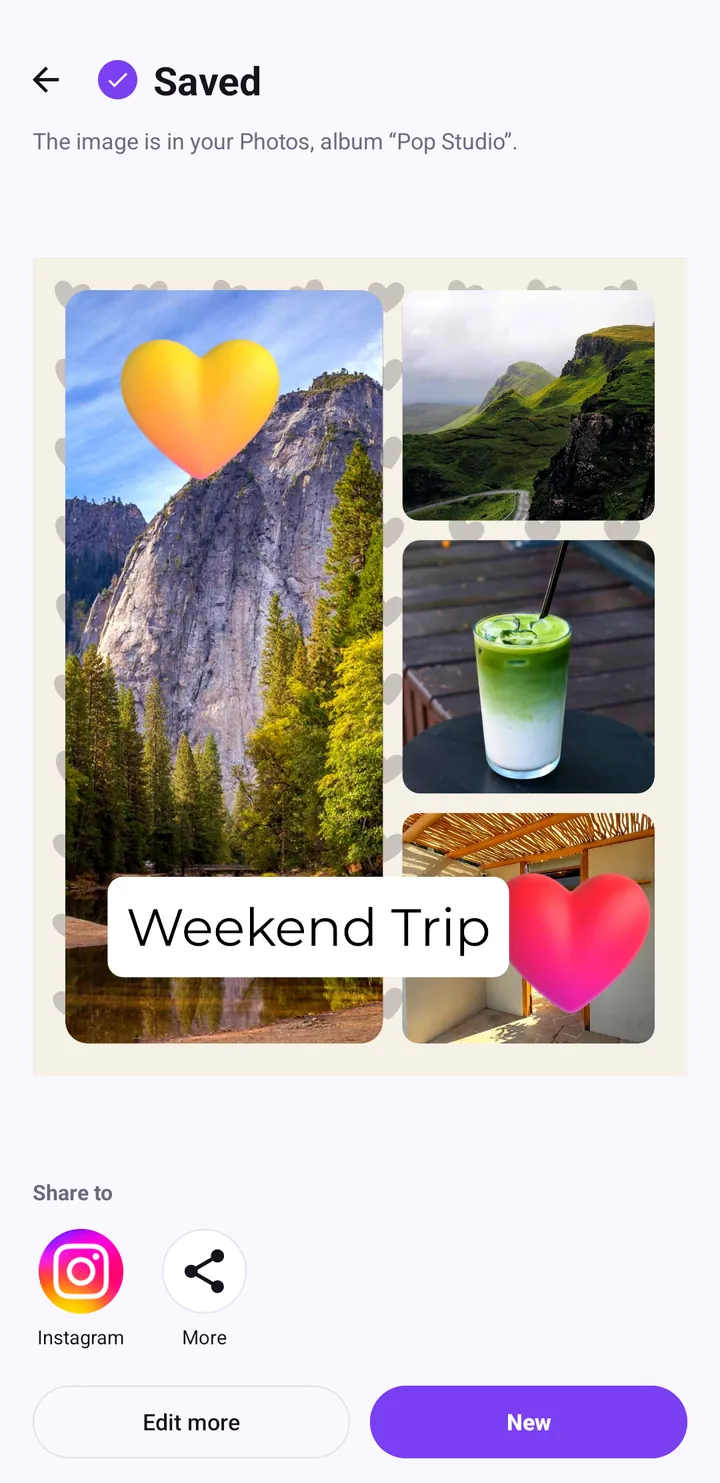
For everything about where files go and how sharing works, see save, share and find your creations.
Your first collage, start to finish
Here is the whole flow in one list you can follow with the app open:
- On the home screen, tap Collage.
- In the photo picker, tap 2 to 9 photos, then tap Done.
- On Layout, tap the arrangement you like.
- On Ratio, tap 4:5 for a feed post or 9:16 for a Story.
- On Border, raise Gap and Corner a little.
- On Background, tap a colour or pattern.
- Optionally add a sticker on Sticker and a caption on Text.
- On Filter, try one filter and lower Strength if needed.
- Tap Export, choose JPEG · smaller file, and share from the Saved screen.
If you change your mind at any point, the undo arrow at the top steps back one change at a time, and redo brings it back.
Beginner tips and common mistakes
Tips that make a visible difference
- Choose the ratio early. Changing ratio after placing stickers and text can shift how everything fits.
- Mix one wide shot with close-ups. A landscape in the big cell plus details in the small ones tells a story.
- Use one filter for the whole collage. It ties together photos taken at different times of day.
- Keep text short. Two or three words, like "Weekend Trip", read better than a sentence.
Mistakes to avoid
- Too many stickers. Two or three well-placed stickers look intentional; ten look cluttered.
- Zero gap with busy photos. Without spacing, similar photos blur into one another.
- Exporting PNG for a quick chat message. It works, but the file is larger than it needs to be.
- Covering faces. Check stickers and captions are not sitting on someone's eyes before you export.
Privacy, ads and Pro in one paragraph each
Privacy. Photos come in through the Android system photo picker, so Pop Studio only sees the images you choose. Editing happens on your device and nothing is uploaded. There is no account to create. Our privacy policy has the full details.
Ads. The free version shows ads. They pay for development and they never touch your photos.
Pro. Tapping the PRO button shows Weekly, Yearly and Lifetime plans, with prices shown in Google Play. Pro removes ads and unlocks premium content such as Pro poster designs and the Party sticker pack. It is tied to your Google Play account, so if you reinstall or change phones, use Restore purchases in Settings and it comes back.
Wrap-up
That is the whole beginner path: tap Collage, pick photos, choose a layout and ratio, add a little spacing and a background, decorate if you like, then export. Once that feels easy, try the Poster gallery for designs that are already laid out for you, and explore the sticker and text guides to make your collages feel more personal. Your next creation is only a few taps away.
Frequently asked questions
How many photos can I put in one Pop Studio collage?
A collage holds up to 9 photos. You pick them all at once in the Android photo picker, then choose a layout that fits.
Do I need an account or storage permission to use Pop Studio?
No. Photos come in through the Android system photo picker, so the app only sees the photos you select, and there is no account to create.
Where does Pop Studio save my collage?
After you tap Export and choose JPEG or PNG, the image is saved to your Photos in an album called Pop Studio. You can also share it straight from the Saved screen.
Is Pop Studio free?
Yes, it is free with ads. An optional Pro upgrade (Weekly, Yearly or Lifetime, priced in Google Play) removes ads and unlocks premium content.
Which Android version does Pop Studio need?
Pop Studio runs on Android 7.0 and newer.
Keep reading
How to Make a Photo Collage on Android: Layouts and Spacing
A step-by-step guide to building a balanced photo collage in Pop Studio: choosing layouts, framing photos in each cell, picking a ratio and getting the spacing right.
Read the guide →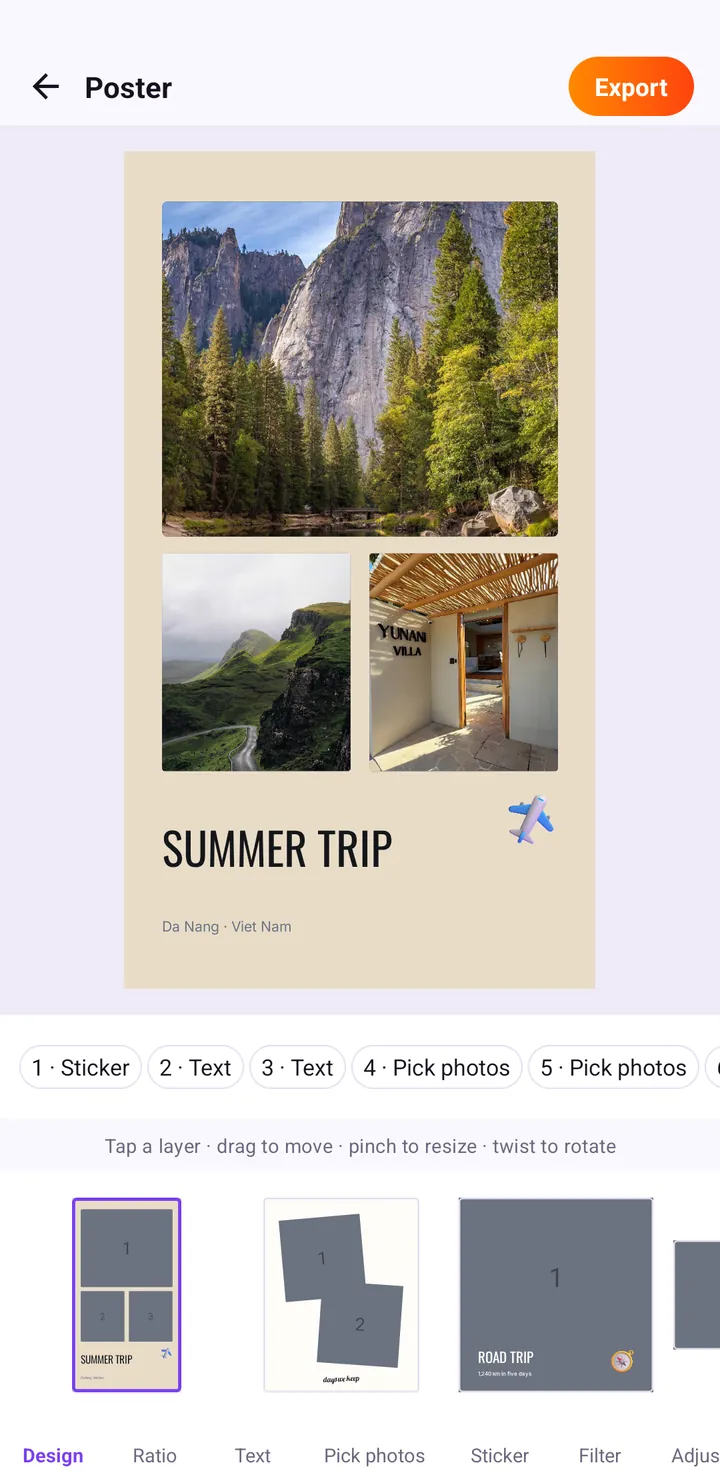
Poster Templates: Make a Summer Trip Travel Poster Fast
Turn your trip photos into a finished travel poster with Pop Studio's poster templates. We build a SUMMER TRIP poster step by step, then personalise it.
Read the guide →Save a collage to your gallery, share it, and keep photos private
Everything that happens after you tap Export: choosing JPEG or PNG, the Saved screen, sharing to Instagram, TikTok and other apps, finding your work in the Pop Studio album, and why no photo is ever uploaded.
Read the guide →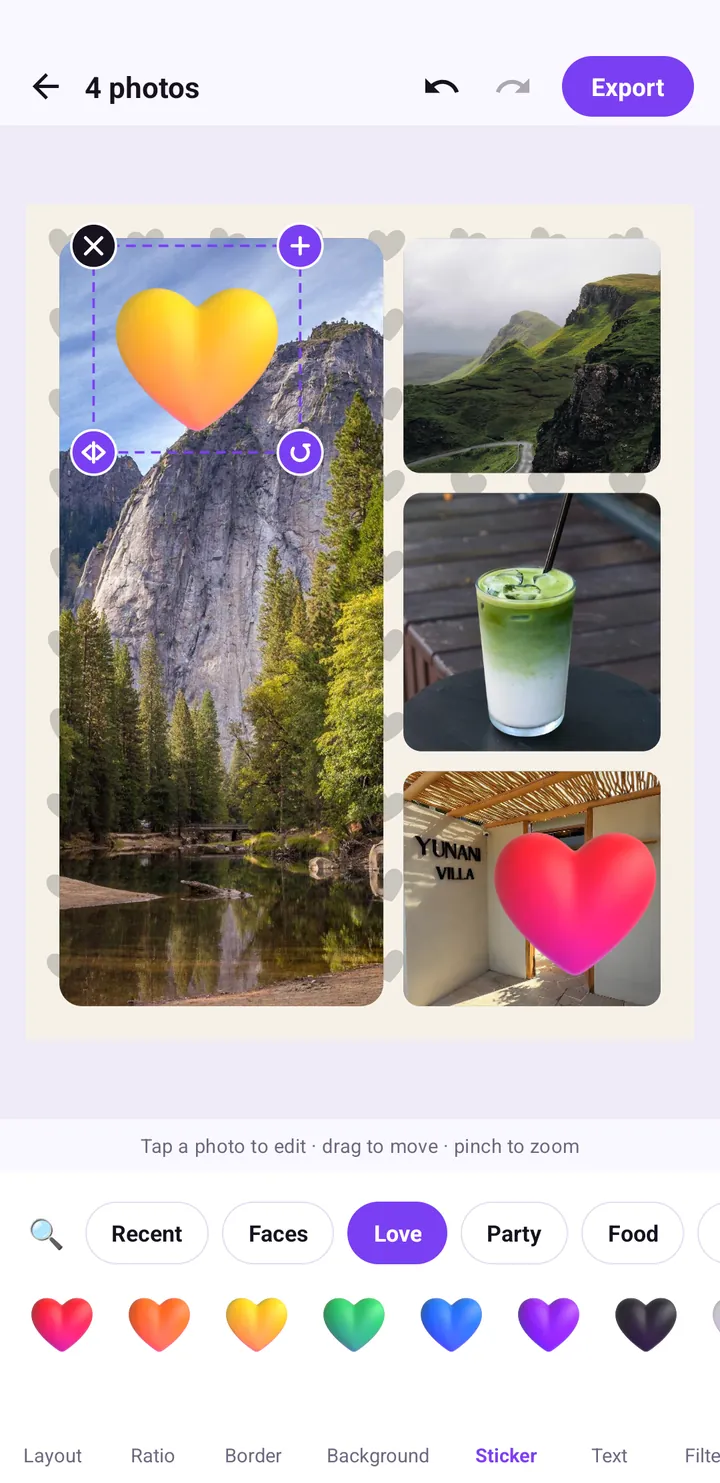
Add Stickers to Photos: Every Category and How to Use Them
Everything about stickers in Pop Studio: what each category holds, how to search, how to move, scale, rotate and remove stickers, and placement tips that avoid clutter.
Read the guide →